
반응형
Platform IO 구성 및 Sample Code
아래는 PlatformIO Project의 platform.ini 파일 구성이다.
; PlatformIO Project Configuration File
;
;   Build options: build flags, source filter
;   Upload options: custom upload port, speed and extra flags
;   Library options: dependencies, extra library storages
;   Advanced options: extra scripting
;
; Please visit documentation for the other options and examples
; https://docs.platformio.org/page/projectconf.html

[env:esp32-c3-devkitc-02]
platform = espressif32
board = esp32-c3-devkitc-02
framework = arduino

monitor_port = COM26
monitor_speed = 115200 ; 시리얼 콘솔 사용 시 사용할 속도
upload_port = COM26 ; 업로드에 사용할 COM Port(장치관리자->포트->ESP32의 포트 번호 확인 후 설정(Ex. COM4: COM[4]))
upload_speed = 92160 ; 보드에 코드를 올릴 때의 속도

build_flags =
	-D ARDUINO_USB_MODE=1
	-D ARDUINO_USB_CDC_ON_BOOT=1

lib_deps =
    https://github.com/coryjfowler/MCP_CAN_lib
lib_deps에 https://github.com/coryjfowler/MCP_CAN_lib 가 추가 된 모습을 볼 수 있다.
위 라이브러리는 CAN Data의 송/수신을 쉽게 사용할 수 있게 해준다.
구성을 마쳤다면 CAN Data를 수신하는 코드를 작성해보자!
#include <mcp_can.h>
#include <SPI.h>

long unsigned int rxId;
unsigned char len = 0;
unsigned char rxBuf[8];
char msgString[128];                        // Array to store serial string

#define CAN0_INT 3                              // Set INT to pin 3
MCP_CAN CAN0(7);                               // Set CS to pin 7


void setup()
{
  Serial.begin(115200);

  // Initialize MCP2515 running at 16MHz with a baudrate of 500kb/s and the masks and filters disabled.
  if(CAN0.begin(MCP_ANY, CAN_500KBPS, MCP_8MHZ) == CAN_OK)
    Serial.println("MCP2515 Initialized Successfully!");
  else
    Serial.println("Error Initializing MCP2515...");

  CAN0.setMode(MCP_NORMAL);                     // Set operation mode to normal so the MCP2515 sends acks to received data.

  pinMode(CAN0_INT, INPUT);                            // Configuring pin for /INT input

  Serial.println("MCP2515 Library Receive Example...");
}

void loop()
{
  if(!digitalRead(CAN0_INT))                         // If CAN0_INT pin is low, read receive buffer
  {
    CAN0.readMsgBuf(&rxId, &len, rxBuf);      // Read data: len = data length, buf = data byte(s)
    sprintf(msgString, "Standard ID: 0x%.3lX       DLC: %1d  Data:", rxId, len);

    Serial.print(msgString);
	for(byte i = 0; i<len; i++){
      sprintf(msgString, " 0x%.2X", rxBuf[i]);
	  Serial.print(msgString);
    }

    Serial.println();
  }
}
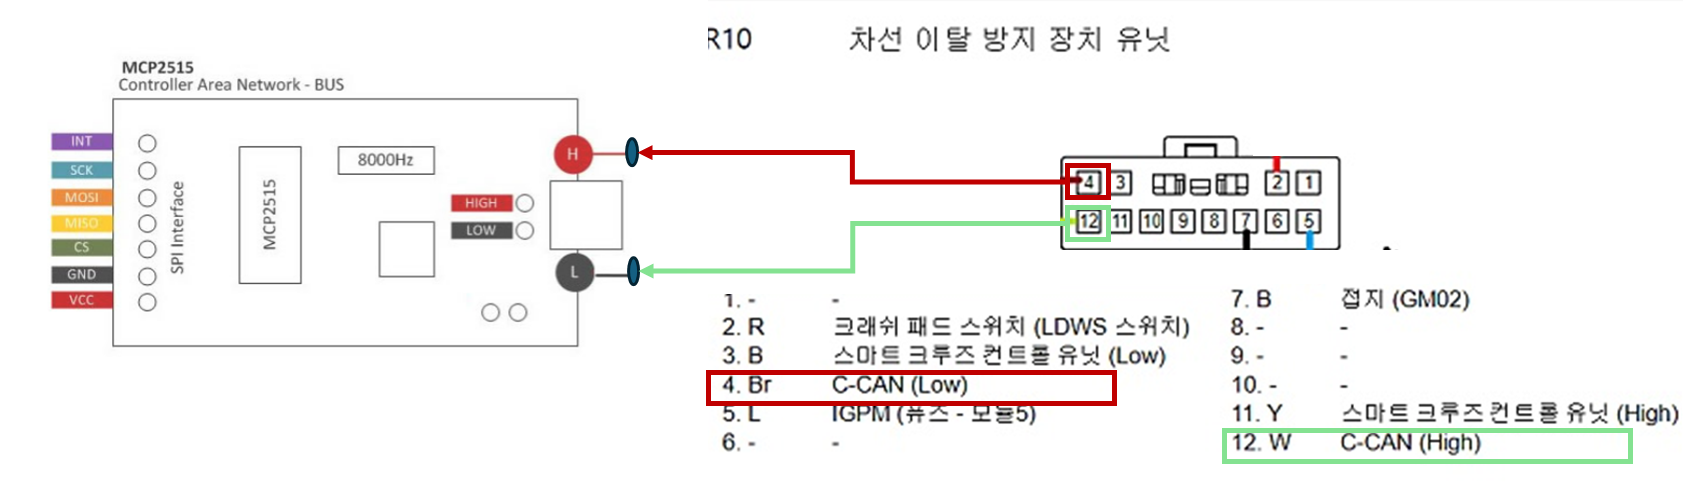
차량의 C-CAN Line과 연결
차량에는 C-CAN, B-CAN, M-CAN등 여러 종류의 CAN Network가 존재한다.
보고싶은 데이터가 있는 CAN Network에 MCP2515를 연결해보자!
우리가 관심있는 MFC(Multi Function Camera)는 C-CAN을 사용하고 있으므로, C-CAN을 찾아보자.
정비 메뉴얼을 참고하여 C-CAN의 위치를 찾아낸다.
뜯기도 편하고(?) 가까이 있어서 MFC쪽 커넥터에 연결하였다.
실차테스트
MFC 커버를 탈거 후 커넥터를 탈거한다.
점퍼케이블을 연결할 수 있도록 암 케이블로 뽑아놓았다...ㅋㅋㅋㅋ


반응형
'프로그래밍 > ESP32' 카테고리의 다른 글
| [ESP32] 자동차 CAN Hacking - MCP2515 사용하기(3) (1) | 2024.02.08 |
|---|---|
| [ESP32] 타이머 인터럽트 사용하기 (1) | 2024.02.06 |
| [ESP32] 자동차 CAN Hacking - PlatformIO 환경 구성(2) (0) | 2024.02.01 |
| [ESP32] 자동차 CAN Hacking - 보드선정 및 구매(1) (1) | 2024.01.27 |